Individuals who Want wish to apply a fresh passport can go and using the Passport Seva Online Portal. The system will automatically select the date and time at which the applicant will need to be presented for a meeting. To book appointments, a service charge will need to be paid online at http://www.passportindia.gov.in/. The appointment, once confirmed by the service, are often rescheduled or cancelled by the applicant only two time during a year.
Table of Contents
Online Appointment Booking
1. Introduction
The process for booking PSK appointments through Passport Seva Online Portal has undergone a few changes. As per the new process, appointment date/time will be automatically allotted by the system as per the availability of appointment slots at the desired PSK. Prior payment of passport service fee has been mandatory for booking appointments at PSKs. For this purpose, the Online Payment feature has been introduced through the Passport Seva Online Portal www.passportindia.gov.in.
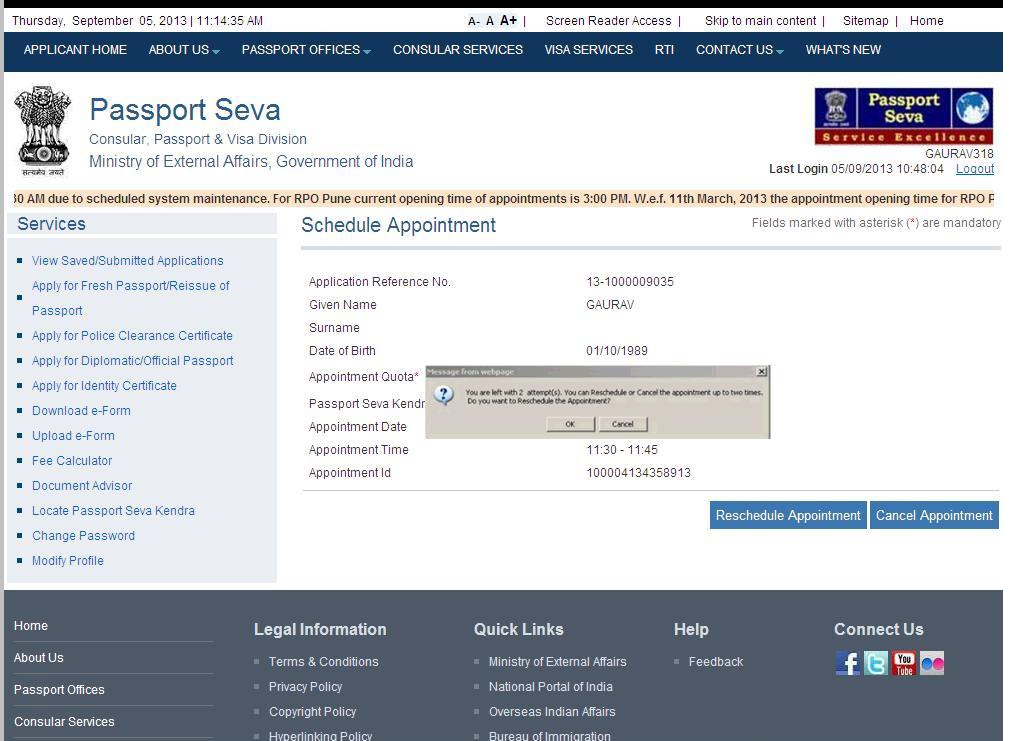
The Online Payment functionality has been deployed in a phased manner starting with the Dehradun Passport Office. An applicant will be able to cancel/reschedule the appointment only twice within one year of the first appointment date. The system will not allow booking of online appointments for that ARN once two reschedule options are exercised or the first appointment was scheduled more than one year ago.
2. Appointment Booking Process with Online Payment
Prior payment of applicable passport service fee has been made mandatory for booking appointments in all Passport Seva Kendras.
Online payment for Passport or related service fee can be done using one of the following payment modes:
- e-Payment Modes:
- Internet Banking (through SBI and associate bank accounts only)
- Debit Card (Visa and MasterCard only)
- Credit Card (Visa and MasterCard only)
- Challan Payment Mode: Bank Challan (payable at SBI branches in India only)
2.1. Internet Banking
Applicant needs to perform the following steps for payment through the Internet Banking payment mode:
- Register through the Passport Seva Online Portal and create the User Id.
- Login with the registered User Id.
- Click the Apply for Fresh Passport/Reissue of Passport link under the Services section.
- Generate an ARN under the Normal or Tatkaal scheme either by filling the form Online or by uploading an e- Form.
- Attempt to schedule an appointment by clicking the Pay and Schedule Appointment link or Schedule Appointment link (if payment is already made) on the View Saved/Submitted Applications screen.
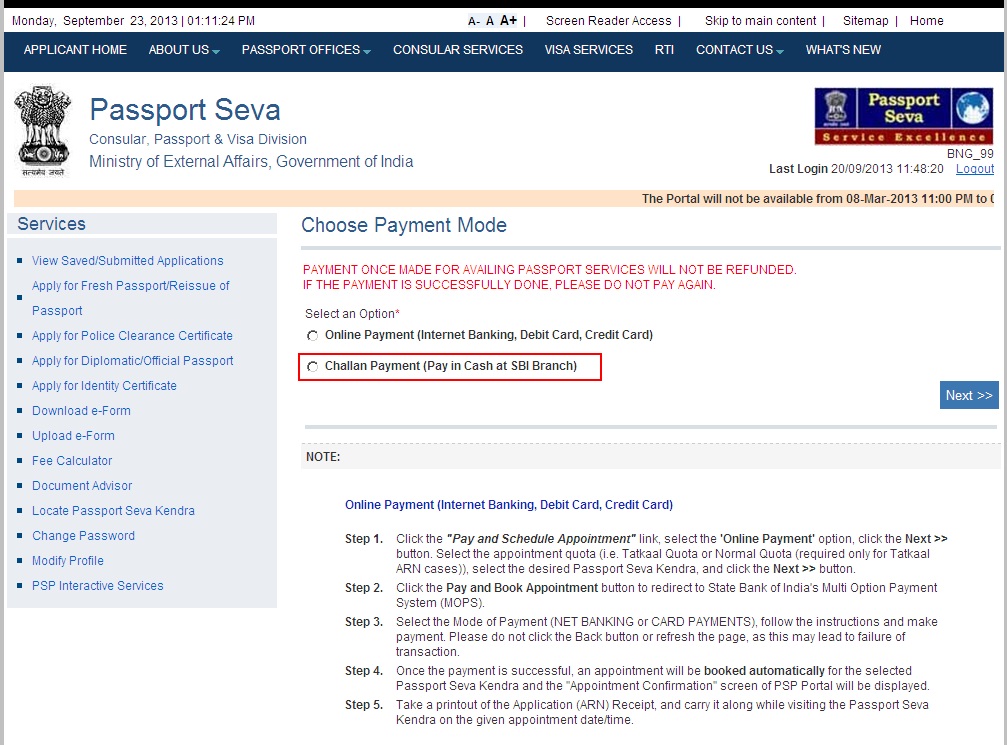
- The Pay and Schedule Appointment link will be available only if the applicant has not made any payment for the booking appointments. On clicking this link, the below two options will be displayed on the screen:
- Online Payment (Internet Banking, Debit Card, Credit Card)
- Challan Payment (Pay in Cash at SBI Branch)
- The Schedule Appointment link will be available if the applicant has made the payment but the appointment is not booked.
- The Pay and Schedule Appointment link will be available only if the applicant has not made any payment for the booking appointments. On clicking this link, the below two options will be displayed on the screen:

- Select the Online Payment option and click the Next >> button to navigate to the next screen.
- Select ‘Appointment Quota’ (Normal/Tatkaal). This option is available only to the applicants with Tatkaal ARNs.
- Select the preferred PSK for appointment booking.
- The system will display the next available appointment date for the selected PSK. After verifying the details, click the Pay and Book Appointment button to redirect to the SBI’s Multi-Option Payment System (MOPS) website. The MOPS screen will be displayed only when the appointment is released for the selected PSK under the desired appointment quota.

- Select NET BANKING as the preferred mode of payment by selecting SBI or any other SBI associate bank listed on the menu. Login using the Internet Banking User Id and password to make Online Payment of indicated passport service fee.

- Login through the Internet Banking screen to make Online Payment of indicated passport service fee.
- After successful payment, the applicant is redirected to the Passport Seva Online Portal.
- The Appointment Confirmation screen is displayed along with appointment details.
- Click the Print Application Receipt button to print the Appointment Receipt, which contains details of the payment made along with the Payment Reference Number as proof of payment.
2.2. Credit/Debit Card
The applicant needs to perform the following steps for payment through the Credit/Debit Card payment mode:
- Follow Steps 1-8 of Section 2.11nternet Banking to redirect to the SBI’s MOPS website. The MOPS screen will be displayed only when the appointment is released for the selected PSK under the desired appointment quota.
- Select CARD PAYMENTS as the preferred mode of payment by selecting the desired Debit or Credit Card payment option listed on the menu. Login using the Internet Banking User Id and password to make Online Payment of indicated passport service fee.

- An applicant will need to provide necessary card details as per the following self-explanatory screens.
- After successful payment, the applicant is redirected to the Passport Seva Online Portal.
- An appointment Confirmation screen is displayed along with appointment details.
2.3. Challan Payment
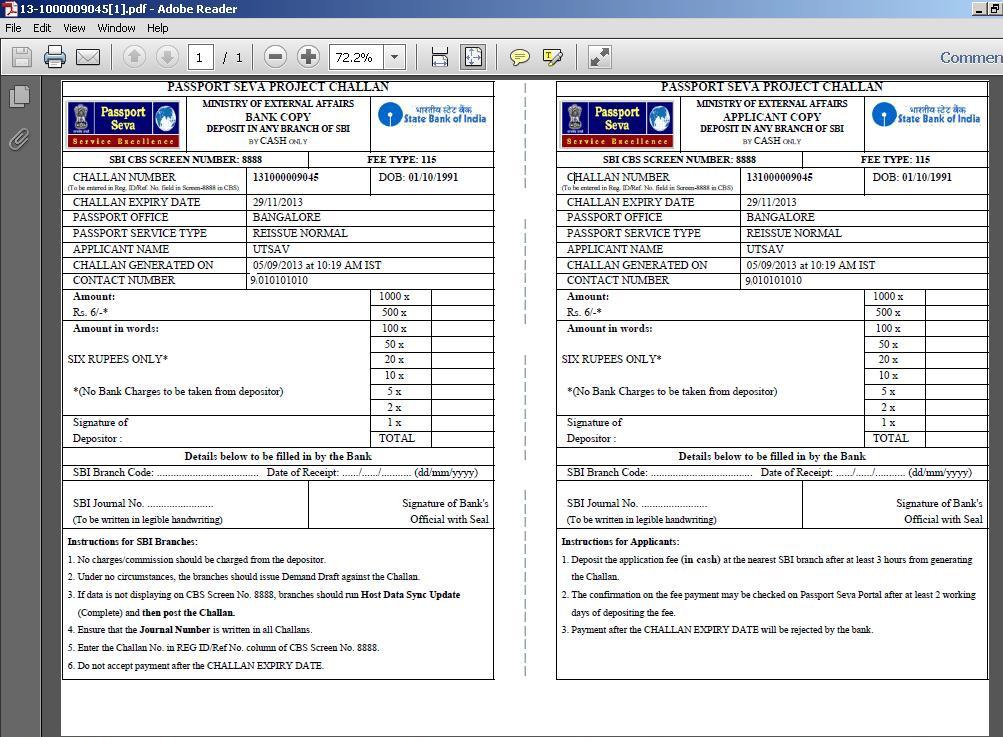
Citizens applying for various passport services (Fresh Issuance/Reissue of Passports/IC/PCC) Online through the Passport Seva Online Portal have an option of making respective application fee payments at SBI branches through a system generated Challan. Applicants need to take a printout of the system generated Challan and submit it at a nearby SBI branch along with the indicated application fee in cash. Payment will be reflected after at least two working days of depositing the fee in the SBI branch. Applicants can try booking PSK appointments once the Payment Status is displayed as ‘Success’ in the system.
Applicant needs to perform the following steps for payment through the Challan payment mode:
- Follow Steps 1 -4 of Section 2.1 Internet Banking to redirect to navigate to the View Saved/Submitted Applications screen.
- Attempt to schedule an appointment by clicking the Pay and Schedule Appointment link or Schedule Appointment link (if payment is already made) on the View Saved/Submitted Applications screen.
- The Pay and Schedule Appointment link will be available only if the applicant has not made any payment for booking appointments. On clicking this link, the below two options will be displayed on the screen:
- Online Payment (Internet Banking, Debit Card, Credit Card)
- Challan Payment (Pay in Cash at SBI Branch)
- The Schedule Appointment link will be available if the applicant has made the payment but the appointment is not booked.

- Select Challan Payment option and click the Next button to navigate to the Make Payment screen.

- Take a printout of this Challan and deposit the same along with the indicated amount (in cash) at any of the SBI branch during banking hours. On deposition, SBI official will enter the fee payment details in the system. The Transaction ID (Bank Journal Number) will be generated and noted in both copies of the Challan. One copy will be kept by the bank and the other copy, duly stamped and signed by bank official, will be returned to the applicant. The ARN details printed on the Challan will be validated by SBI and Payment Status will accordingly be updated in the Passport Seva system after at least two working days.

- The reconciliation process updates Passport Seva Online Portal regarding Payment Status of the Challan. The applicant will be notified by an e-mail regarding the actualization of the Challan.
- The applicant can also track the status of the Challan using the Track Payment Status screen.
- Once the Payment Status is confirmed as ‘Success’, an e-mail will be sent to the applicant (if e-mail ID has been provided while filling application form) to book a PSK appointment. An applicant needs to navigate to the View Saved/Submitted Applications screen and click the Schedule Appointment link to schedule an appointment.
- Select ‘Appointment Quota’ (Normal/Tatkaal). This option is available only to the applicants with Tatkaal ARNs.
- Select the preferred PSK for appointment booking.
- Click the Book Appointment button. An Appointment Slot (if available) is booked automatically for the selected PSK. The appointment confirmation screen with appointment details is displayed.
3. Cancel/Reschedule Appointment
The applicant needs to perform the following steps for canceling or rescheduling a booked appointment:
- Click the Schedule Appointment link on the View Saved/Submitted Applications screen.
- Click the Reschedule Appointment/Cancel Appointment button. A confirmation message displaying the count of rescheduling/cancel attempts left is shown.

- In case of rescheduling the appointment, select the preferred PSK, and click the Next button.
- After checking the available appointment date displayed for the PSK, click the Book Appointment button. An appointment (if available) is booked automatically for the selected PSK and previously booked appointment for the ARN is automatically canceled.
- The Appointment Confirmation screen is displayed with the Print Application Receipt button to print the application receipt.
Important Links
| Book Passport Appointment | Click Here |
| How to Apply for Fresh Passport | Click Here |
| Official Website | Click Here |


